Combined Type Strapping Tool,Intelligent Bundling Machine With Sensors,Heavy Construction Material Strapping Machine,Secure Bundling Equipment for Transport YANBIAN LONGCHUAN PACKING MACHINERY CO., LTD , https://www.yblcmachinery.com
How To Show Your Vacuum Some Love
Vacuum cleaners are small yet mighty machines that are both simple to operate and maintain. Proper maintenance of your vacuum can significantly enhance its performance and longevity, making it a worthwhile investment for your home and health. A well-maintained vacuum ensures that your living space remains free from dust, allergens, and dirt, contributing to a cleaner environment.
We often overlook the fact that vacuums require attention too, especially considering how much work they do to keep our homes tidy. Neglecting regular cleaning can lead to spreading dust and germs rather than removing them, and it can also result in clogs that affect suction power and damage components like hoses, canisters, and belts.
Routine maintenance can extend a vacuum's lifespan from an average of five to eight years to as long as ten or fifteen years. This not only saves you money but also allows you to continue enjoying a device that works diligently for your household.
Below, I’ll outline some practical steps for maintaining your vacuum cleaner to ensure it lasts for many years.
---

### **How To Clean Your Vacuum**
Always refer to your vacuum cleaner's manual for specific care instructions. Here’s a general guide to keeping your vacuum eco-friendly and efficient:
#### **1. Unplug It First**
Before starting any cleaning, make sure the vacuum is unplugged. Avoid exposing electrical parts to water, rubbing alcohol, or vinegar.
#### **2. Clean the Canister or Bag**
Remove the vacuum canister or bag and empty it into the trash. If it’s disposable, replace it immediately. For reusable containers, rinse them thoroughly under warm water. Use a strong dish soap or a vinegar solution (one part vinegar to two parts water) to disinfect the interior. Dispose of any sponges or paper towels used during cleaning, as they might harbor germs. Don’t forget to sanitize your sink afterward.
Ensure the canister is fully dry before reinstalling it. Moisture left inside can encourage mold growth.
#### **3. Maintain the Beater Bar**
Lay the vacuum on its side and disassemble the parts. Locate the beater bar, which is the rotating brush within the vacuum head. Hair, threads, and other debris tend to accumulate here. Carefully snip away any tangles with scissors. Next, dampen a cotton pad with rubbing alcohol and gently swipe the bar to disinfect and remove dirt. Alternatively, spray a diluted vinegar solution onto the brush and rotate it to clean all sides. Avoid applying vinegar directly to rubber belts, as acid can degrade them over time. Inspect the belt for signs of wear or cracks; replace it if necessary.
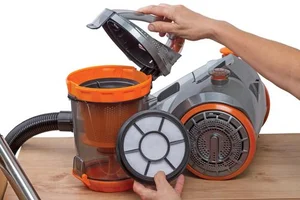
#### **4. Clean the Filter**
Filters should generally be cleaned every six months, or sooner if you notice a musty smell when using the vacuum. Remove the filter and rinse it under warm water. Then, soak it in a vinegar solution (one part vinegar to two parts water) to eliminate odors and bacteria. Allow the filter to air dry completely before reinserting it into the vacuum.
#### **5. Disinfect the Base**
The base of your vacuum and its attachments are frequently exposed to germs. After each use, disinfect these areas using a cotton pad soaked in rubbing alcohol. This quick step prevents cross-contamination.
#### **6. Tackle the Hose**
If your vacuum has a detachable hose, remove it first. To clean inside the hose, wrap a broom or mop handle with paper towels secured by duct tape. Saturate the towels with a diluted vinegar solution, then gently push the handle into the hose, twisting it around to scrub the interior. Be cautious not to apply too much force, as this could damage the hose. Let the vinegar dry completely—this usually takes about 24 hours—and avoid turning the vacuum on until it’s fully dried.
Alternatively, you can substitute the vinegar solution with dryer sheets wrapped around a handle. These will help sanitize the hose while reducing friction and improving suction.
#### **7. Dust the Exterior**
Use a microfiber cloth to wipe down the vacuum’s outer shell. For extra cleaning power, add a light mist of vinegar or all-purpose cleaner to the cloth.
---
### **How To Use Your Vacuum**
Here are some tips to maximize your vacuum’s efficiency and lifespan:
1. Store your vacuum upright whenever possible. Wrapping the hose around a hook keeps it off the floor and reduces the risk of damage.
2. Never let the vacuum bag or canister fill beyond three-quarters full to avoid clogs and potential damage.
3. Empty the canister or bag after every use to prevent blockages.
4. Rub the vacuum hose with wax paper before attaching or detaching tools to minimize friction and avoid stuck connections.
5. Clear small objects from the floor before vacuuming to protect internal components.
6. If you own a HEPA vacuum, use it to circulate fresh air in a room after cleaning. Leaving it running for 3-5 minutes can help purify the air further.
---

### **The Bottom Line**
By dedicating time to maintain your vacuum regularly, you’ll enjoy a cleaner home and a longer-lasting appliance. Proper upkeep ensures optimal suction power and keeps your floors, walls, ceilings, and furniture free from dust.
For additional support, explore Floorcare’s extensive selection of vacuum parts and replacements. Their expertise ensures your vacuum stays in top condition for years to come.
Still unsure about what parts you need? Reach out to Floorcare today—they’re happy to assist with any questions you may have!